

Occasionally, I’ll do a review of something I purchased that I think others might benefit from. This is something that I think many would like to know about. If you are a DIY (Do-It-Yourself) homeowner and have ever replaced a circuit breaker then you should be able to handle this relatively easy installation.
 We all remember Superstorm Sandy and though I didn’t run out like a crazy person to buy a generator then, I did eventually find one at a yard sale for a bargain price earlier this year.
With the last few days being above average in temperature I decided to install an item for that generator, that had remained in an unopened box all summer.
I purchased a Generator Power Transfer Kit and told myself that I would be ready for any storm that might knock out power. It was something I wanted for my home, because I realized that running extension cords from outside to a few appliances like the refrigerator and a couple of lamps would not only be a pain in the butt, but wouldn’t help me in providing power to my furnace.
UPDATE 12/14/15 – Worried someone might kill themselves, I have been requested by a Counciman to post a warning. Though a disclaimer and warning was already posted at the end of this article, I will put it here, as well:
Do not perform electrical work unless you feel confident in your abilities and have a basic understanding of electricity. Also, you should have a Certified Electrical Inspector sign off on your completed installation.
A friend put me on the idea of installing a transfer system when he purchased one of those expensive Generac generator systems that turn on automatically when it senses a power failure and also does a scheduled self-diagnose. While he doesn’t have to spend the two minutes it takes to pull a generator cord and manually flip switches in his basement, I wasn’t about to spend $7000 to power my home with a generator.
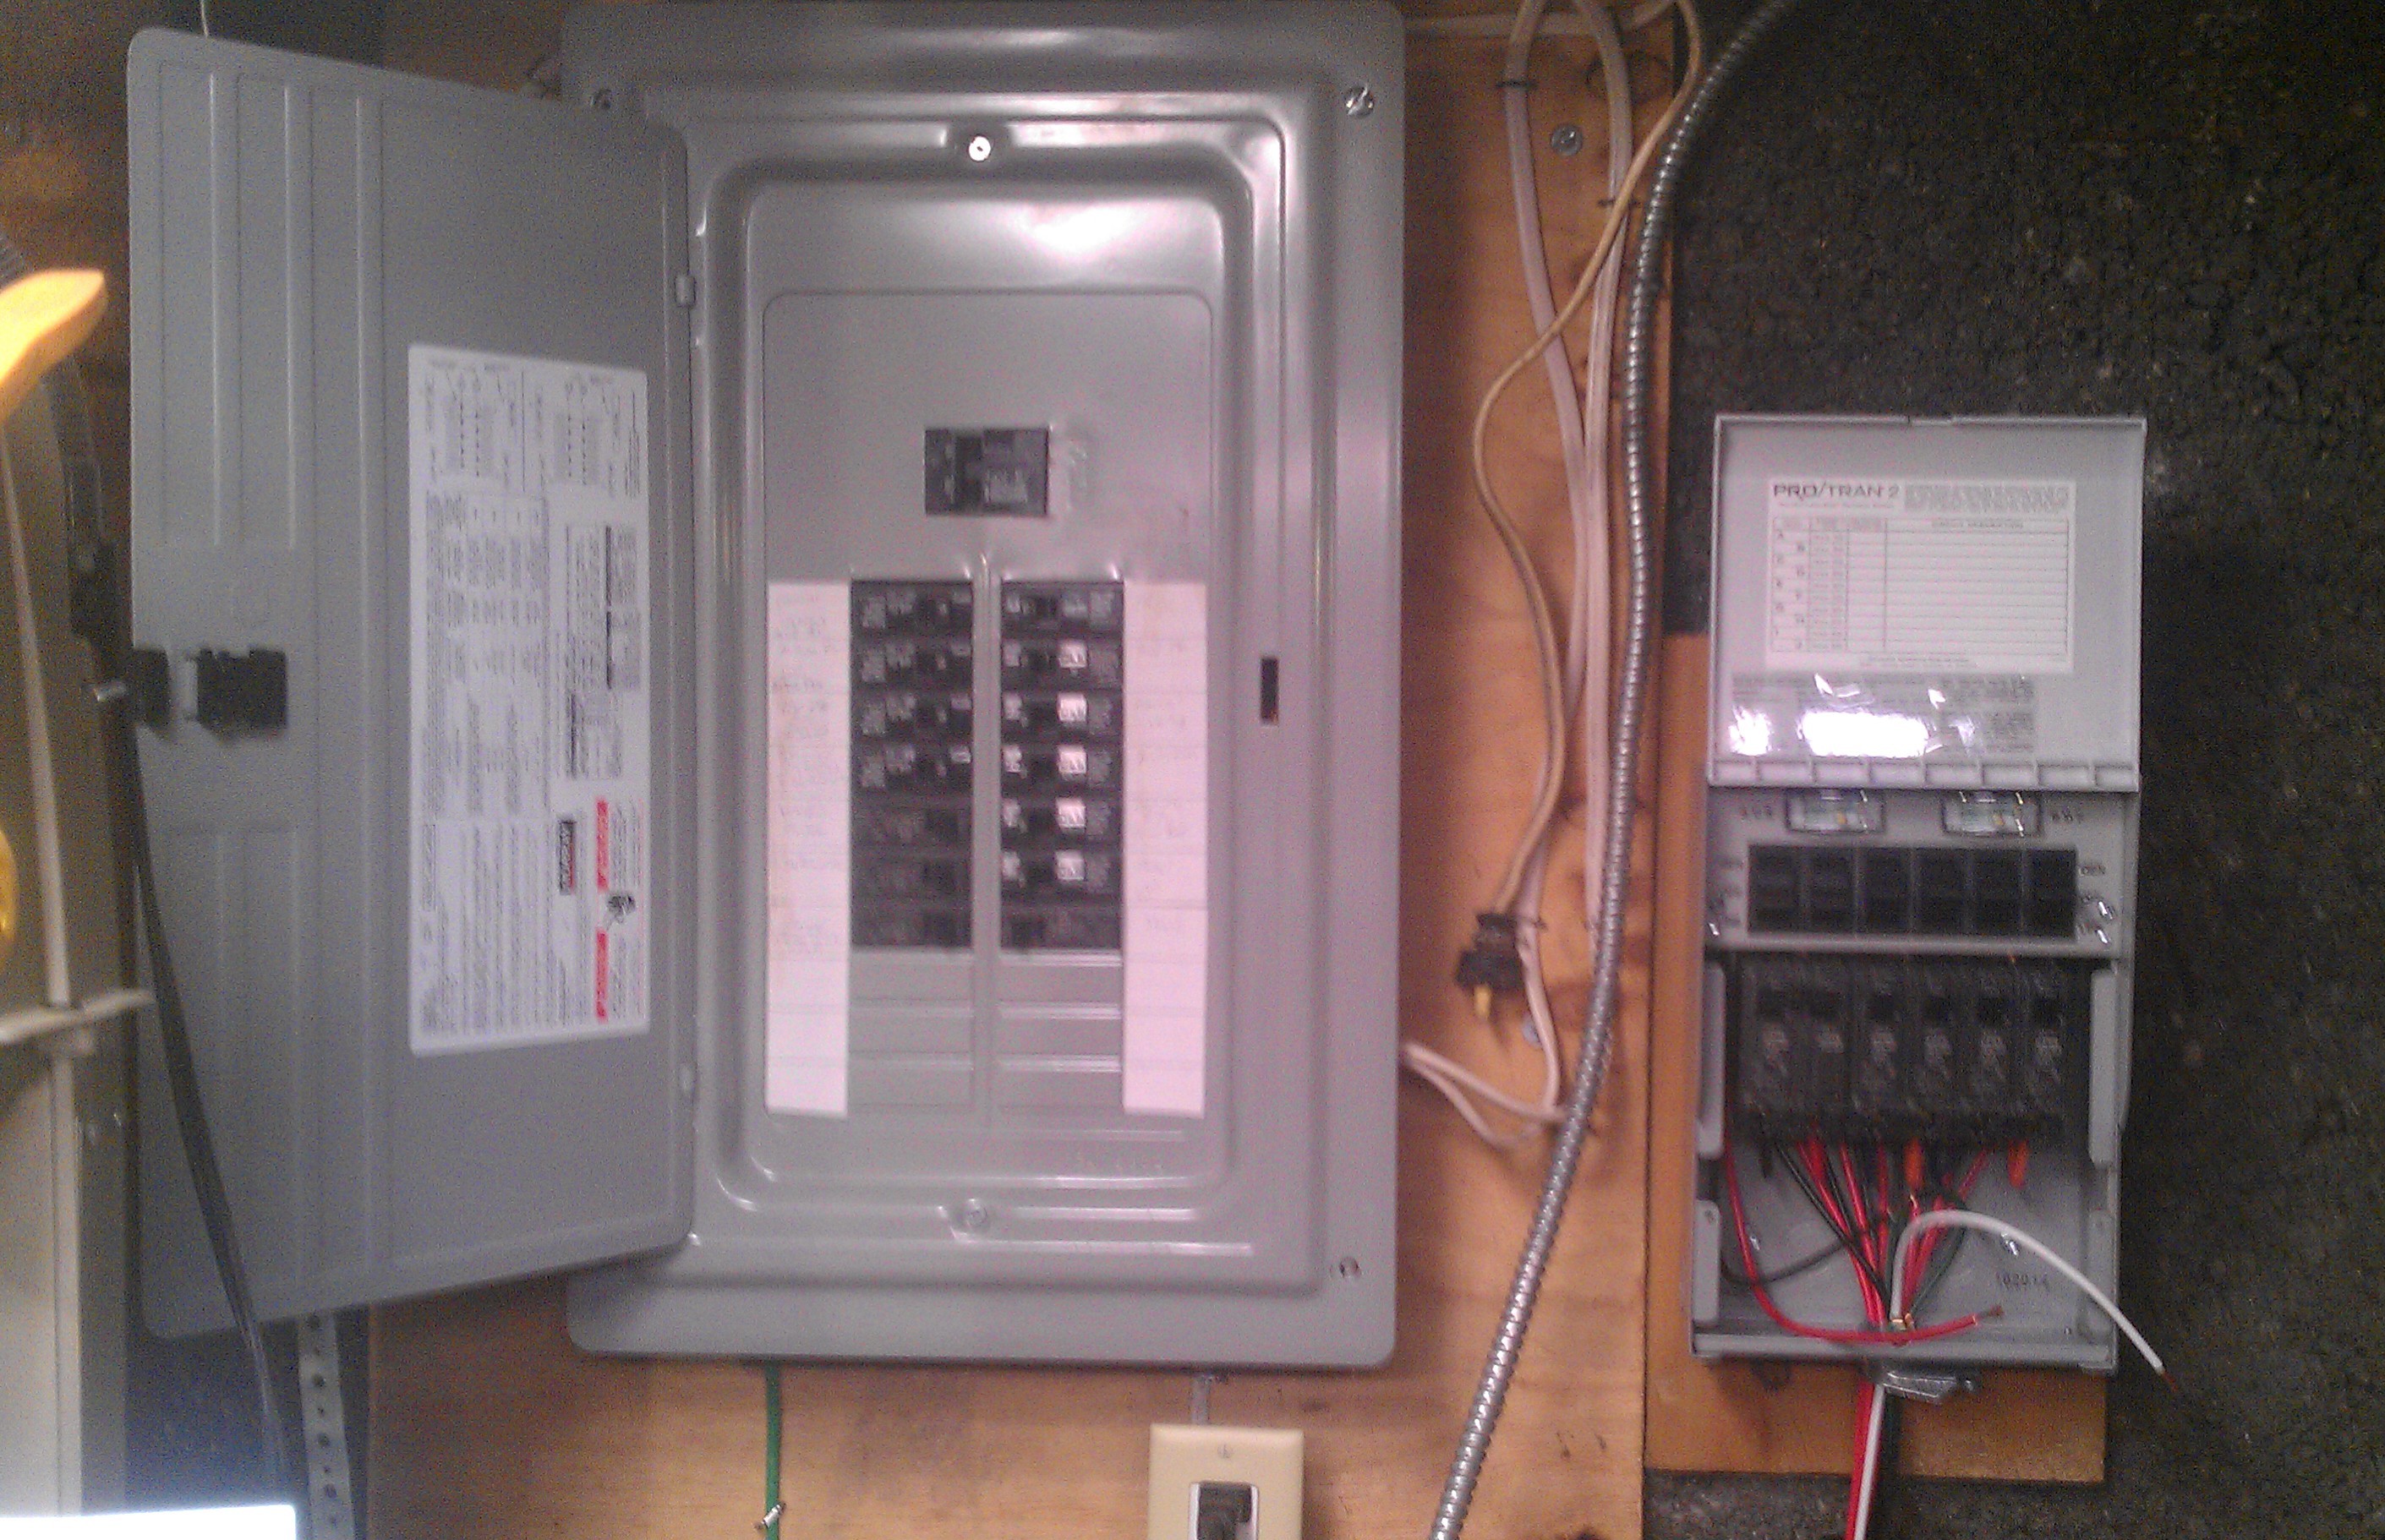
 So, I bought a $270 kit that powers 6 circuits on my home’s breaker panel. There are other, larger kits available providing more circuit connections if you have a larger generator or home, but 6 circuits is adequate for my needs. Though my generator is only 5000 watts, my kit can handle up to a 7500 watt generator.
It actually took more time prepping for and mounting the boxes, than it took to do the actual wiring.
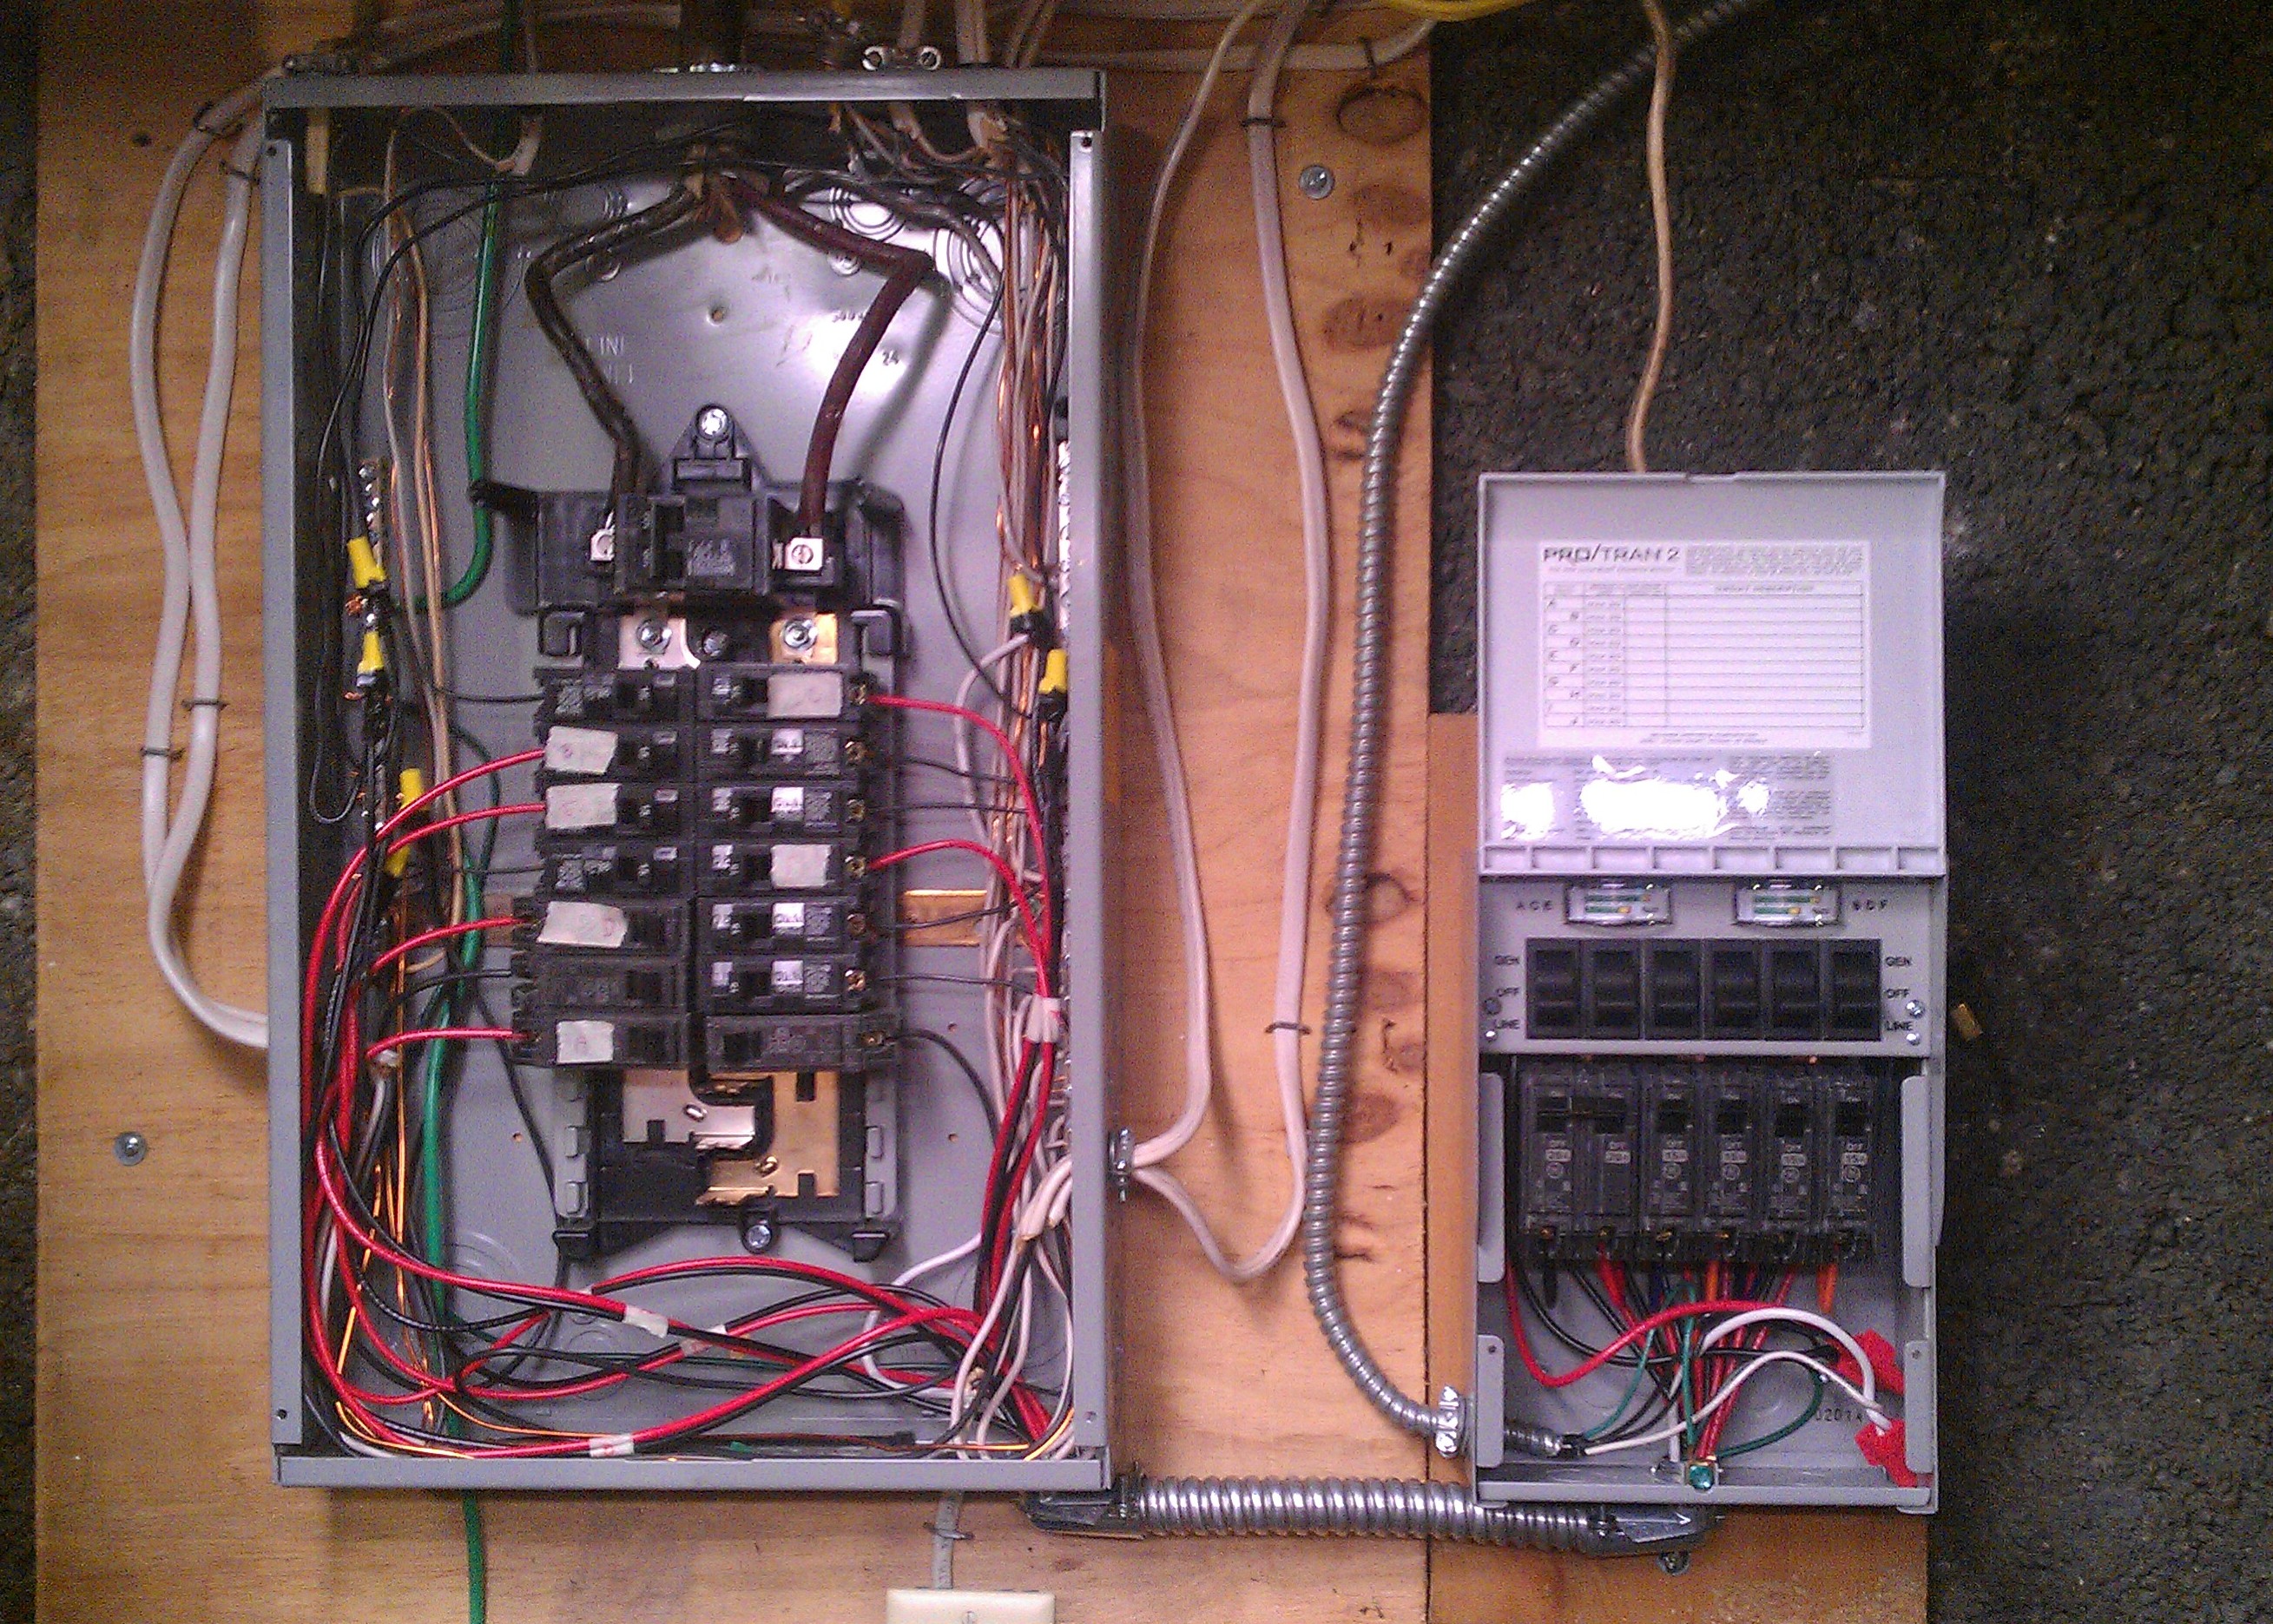
The kit comes with a Remote Power Inlet Box, a 10′ Power Cord with a 30 amp male connector (that runs from the generator to the Remote Power Inlet Box), a Transfer Switch Panel with its own breakers, and an alternate 20 amp male connector for the power cord, if your generator doesn’t have a 30 amp female plug. There is also a section of large flexible conduit (with clamps) that is installed between the transfer switch box and your breaker box to enclose wiring.
Written instructions provided were clear and easy to understand. There is also an instructional video (below).
What it does not come with is the length of 3-1 wiring you will need that runs from the Remote Power Inlet Box to the Transfer Switch Panel. Luckily, a neighbor had some appropriate wire in flexible conduit and gave me the 5 feet I needed (Thanks again, George!). You may require a different length, depending on how far you place the Power Inlet Box from your Transfer Switch Box.
This wire is different from the standard 2-1 wiring found in your home, that consists of a black, white, and ground wire. The 3-1 wiring has a black, white, ground, and an additional red wire. This is so that the 240v provided by a generator can be split to service the two 120 volts sides of the transfer switches. 3-1 wiring can be found in any local hardware store.
 Note that if you have a generator that only provides 120 volts without an option to provide 240 volts, the transfer switch can only provide power to 3 of the 6 circuits and can not be used to power any 240v circuit in your home, like an electric clothes dryer. This is because you can’t split 120 volts, or get more voltage (240v needed) than is supplied from a generator.
Measuring twice, I drilled a hole through my outside wall to enter my basement, and mounted the back of the Remote Inlet Box to my house. I then ran the length of 3-1 wire I needed into my basement, connected the receptacle box plug to the wire and put on the cover. It was then time for the basement work, where I had to connect the receptacle wiring to the Transfer Switch Panel and wire the 6 circuits into the main breaker box.
Since I have no 240v circuits in my home I removed the tie bar connecting the two transfer switches that would provide 240 volts. These now became two separate 120 volt switches and I could disregard the instructions on powering a 240v circuit in my house service panel.
If I have any complaints it is identifying the pairs of wires from the transfer box that have to be used for each circuit. There is a black and red wire, each marked with corresponding letters printed on the wires (A,B,C,D,E, and F). When you have old eyes like mine, “E” and “F” wires looked very similar. My drugstore reading glasses helped immensely.
Also, I noticed that once I trimmed them to length, some would have their markings end up on my floor, so I paired them before starting, wrapped them with tape below where I would trim, and wrote the letter designation on my tape. I also put a piece of tape on the 6 breakers of my house breaker panel to designate which would be used with the transfer switch I chose to connect to it. That made it simpler than having to refer back to my removed panel cover and counting down to the breaker I wanted, each time I made the connection.
 The actual trimming, connecting, and wire nutting of all the wires took less than 1/2 hour. The entire job, including prep work, mounting another backer board to the basement wall, and having to change the 30 amp plug on the power cord to the 20 amp, took me less than 3 actual working hours (I was in no hurry).
The transfer panel has two sides providing 120 volts to 3 circuits each. Switches A, C, and E are on one side. Switches B, D, and F are on the other side. Each side has it’s own power draw indicator meter and the goal is to make the draw as equal as possible on each side.
I did a 30 minute test, running everything on my generator and it worked perfectly.
Should power go out this winter for any length of time I will have heat, television, my computer, downstairs lights, some working receptacles, kitchen appliances, and no spoiled food.
Of course, that’s assuming I can keep getting gasoline for the generator.
Interested in a Power Transfer Kit? CLICK HERE
Just in case, here are some disclaimers and tips, should you decide to install this system:
I am not a licensed electrician, so perform electrical work at your own risk and within your own abilities that you feel confident to perform.
Turning off the main breaker on your home’s electrical panel does not make it completely safe. Though breakers are not powered (this should be verified with a voltmeter), the two thickest wires coming into the panel are “live” from the street. Touching these two wires can result in injury or death. That is, electricity still exists “above” the main breaker, within your service panel.
Have a light source available when you turn off the main breaker at your service panel to perform connections, if natural light will be insufficient.
Have all required tools available with you, before beginning work.
DOUBLE CHECK YOUR CONNECTIONS before powering on system.

Test your “line” and “generator” sides for 30 minutes before shutting down your generator.
Disclaimer: On January 4, 2016, the owner of WestEastonPA.com began serving on the West Easton Council following an election. Postings and all content found on this website are the opinions of Matthew A. Dees and may not necessarily represent the opinion of the governing body for The Borough of West Easton.


